Imagine stepping out into your backyard and feeling the cool, smooth surface of natural stone under your feet. No more slippery wet grass or boring concrete slabs, just timeless beauty that lasts for years. That’s the magic of stone pavers. If you’re dreaming of sprucing up your patio, driveway, or pool area, stone pavers could be your perfect fix. In this guide, we’ll chat about what makes them so special, how to pick the right ones, and even walk you through getting them installed and kept looking sharp.
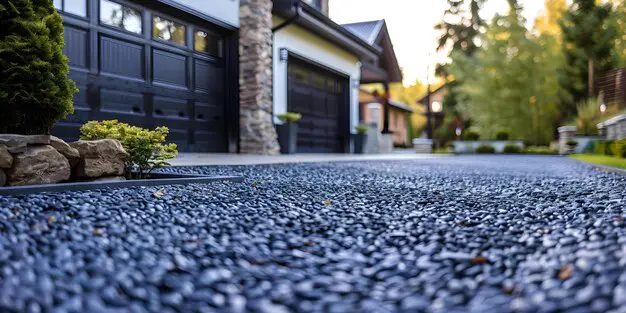
Stone pavers are basically flat stones cut or shaped to create pathways, patios, or even indoor floors. Made from 100% natural rock, they’re tough, eco-friendly, and add that wow factor to any outdoor space. Whether you’re hosting barbecues or just chilling with a book, they turn ordinary yards into inviting retreats. Let’s dive in and see why they’re worth the hype.
Why Stone Pavers Are a Game-Changer for Your Outdoor Space
Picture this: You’ve got a backyard that’s seen better days cracked concrete, uneven gravel, or just plain old dirt. Stone pavers swoop in like superheroes. First off, they’re incredibly durable. Unlike wood that rots or plastic that fades, natural stone stands up to Australia’s harsh sun, rain, and foot traffic without breaking a sweat. They can last decades, making them a smart investment for your home’s value.
Then there’s the look. Stone pavers bring elegance and a natural vibe that no fake material can match. Think earthy tones that blend with your garden plants or sleek edges for a modern twist. They’re versatile too perfect for cozy patios where you sip coffee or wide driveways that handle cars like champs. Plus, they’re slip-resistant when wet, keeping your family safe during those summer sprinklers or winter puddles.
Environmentally, they’re a win. Sourced straight from the earth, they don’t leach chemicals into your soil, and their thermal properties keep things cooler underfoot in hot Aussie weather. Homeowners love how they boost curb appeal neighbors will be green with envy! And the best part? They’re low-maintenance once set up, saving you time and hassle down the line.
Exploring the World of Stone Paver Types
Not all stones are created equal, right? That’s what makes choosing stone pavers fun they come in so many flavors to suit your style and budget. At places like Stone Pavers Australia, you’ve got options galore, from classic bluestone to exotic travertine. Let’s break down some popular picks in simple terms.
Bluestone Pavers: These Aussie favorites have a deep blue-gray hue that’s super tough for high-traffic spots like driveways. They’re non-slip and weather beautifully over time, developing a lovely patina.
Travertine Tiles: If you want something light and airy, go for travertine. It’s that creamy beige stone you see around pools porous for a textured grip but elegant enough for indoor-outdoor flow. Prices start around $59 per square meter, making it accessible.
Granite Pavers: For bold colors and rock-hard strength, granite is your guy. It comes in reds, blacks, and greens, ideal for patios that pop against green lawns. It’s heat-resistant, so no worries about scorching barbie feet.
Limestone and Sandstone: Softer and more affordable, these bring a rustic charm. Limestone’s light tones suit coastal vibes, while sandstone’s warm yellows warm up shady spots. Both are great for pathways winding through gardens.
Don’t forget fun extras like crazy paving for a quirky, puzzle-piece look, cobblestones for that old-world charm, or pool coping to edge your swim spot safely. Whatever you choose, think about your climate darker stones hide dirt better, while lighter ones reflect heat. Pro tip: Order free samples from sites like stone-pavers.com.au to test them in your own sunlight. It’s like trying on shoes before buying!
Step-by-Step: Installing Stone Pavers Like a Pro
Alright, ready to roll up your sleeves? Installing stone pavers isn’t rocket science, but it does take some planning and elbow grease. If you’re a DIY newbie, grab a buddy and some basic tools: shovel, tamper, level, rubber mallet, and a wet saw for cuts. For bigger jobs, call in pros safety first! Here’s a straightforward guide based on tried-and-true methods.
Step 1: Plan and Prep Your Space
Measure your area and sketch a layout. Mark boundaries with string and stakes. Check for underground pipes or cables better safe than sorry. Aim for a slight slope (about 1-2%) away from your house to drain water.
Step 2: Excavate the Site
Dig out 10-15 cm deep (4-6 inches) across the whole area. Remove grass, roots, and rocks. Rent a compactor if it’s a large spot to even things out. This base is key mess it up, and your pavers will wobble later.
Step 3: Lay the Base Layer
Spread 7-10 cm of gravel or road base evenly. Wet it lightly and compact it firm with a plate compactor or tamper. This creates a stable foundation that won’t shift over time.
Step 4: Add the Sand Bed
Top the base with 2-3 cm of coarse sand or paver bedding sand. Screed it level using straight boards and a level tool. The sand cushions the stones and helps with adjustments.
Step 5: Place Your Pavers
Start from one edge maybe against a wall or straight line. Lay stones in your pattern (herringbone looks pro!), tapping them down with a rubber mallet. Keep joints about 5-10 mm wide. Use the level often to avoid hills and valleys.
Step 6: Cut and Fit Edges
For tricky spots, mark and cut pavers with a wet saw. Wear goggles flying chips aren’t fun. Fit pieces snugly without forcing.
Step 7: Fill Joints and Compact
Sweep polymeric sand into gaps, then mist with water to set it like mortar. Compact the whole surface again. For mortar joints (better for pools), mix and trowel it in.
Step 8: Edge and Seal
Install edging restraints to lock everything in. Once cured (a day or two), seal with a stone-safe product to protect against stains. Boom you’re done! Step back and admire your work with a cold drink.
Total time? A weekend for a small patio. If it feels overwhelming, suppliers like Stone Pavers Australia offer expert advice to guide you.
Keeping Your Stone Pavers Looking Fresh: Easy Maintenance Tips
You’ve nailed the install now let’s keep those beauties shining without the sweat. Natural stone is forgiving, but a little TLC goes a long way. Here’s how to maintain them simply.
Sweep weekly with a stiff broom to whisk away leaves and dirt. For deeper cleans, hose them down or use a pressure washer on low (under 1500 PSI) to avoid etching the surface. Mix a mild, pH-neutral cleaner no vinegar or bleach, as they can discolor stone. Spot-treat stains right away: baking soda paste for oil, or hydrogen peroxide for organic gunk.
Weeds popping up in joints? Pull ’em by hand or use a weed torch skip harsh chemicals. Every couple of years, reseal with a penetrating sealer to fend off water and UV damage. In winter, avoid salt-based de-icers; opt for sand or calcium chloride instead.
Moss in shady spots? A vinegar-water mix (diluted) works wonders, followed by a rinse. Regular upkeep means your pavers stay safe, pretty, and problem-free for years.
Spotlight on Stone Pavers Australia: Your Go-To Source Down Under
When it comes to sourcing top-notch stone, Aussies have a gem in Stone Pavers Australia. With over 45 years under their belt and 300,000+ happy customers, they’re the biggest supplier of natural stone pavers nationwide. Their range is massive from budget-friendly sandstone to luxe granite and prices are the lowest around, with up to 25% off right now.
What sets them apart? Free samples (grab as many as you need!), speedy delivery anywhere in Australia, and advice from master stonemasons.
Conclusion
There you have it stone pavers aren’t just rocks; they’re the secret to a backyard that feels like a resort. From their unbeatable durability and stunning variety to the straightforward install and simple care, they make upgrading your outdoor living a breeze. Whether you’re laying a sunny patio or a shady path, the right stones can turn everyday moments into cherished ones.